
The goal of the project was to create a structure within O365 SP to store the employee’s hr-relevant documents. We decided to create a hubsite and a SiteCollection for each and every employee wherein all the documents will be stored. The employees were to get an app which would allow them to request reading rights on their file as well as enable them to see all their certifications and add new certificates to their file.
The challenge was to create a single PowerApp, that would show only the relevant information of the current logged in user from his/her file.
Since PowerApps does not support dynamic datasource adding and switching, we needed to find a workaround. We managed to find a way to have the needed functionality within one single PowerApp utilizing only one datasource.
We achieved it by utilizing PowerApps, Power Automate and SharePoint and not a single premium connector (which were out of bounds due to licensing restrictions).
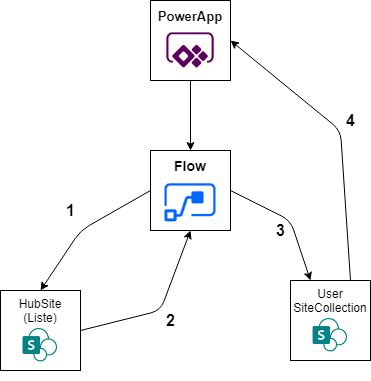
Realization (schematic)
The solution we came up with works as follows:
From within the PowerApp we trigger a PowerAutomate Flow.
- The Flow queries a list within the central HubSite and
- gets back the URL of the current user’s SiteCollection.
- The Flow then accesses the user’s SiteCollection and queries a document library
- which is returned to the app as a csv file.
Within the PowerApp we can now display the contents of the document library inside a gallery control.
Technical realization
Ingredients:
- 1 SharePoint List (for mapping purposes)
- 1 PowerApp (Canvas)
- 1 Power Automate Flow
- n SiteCollections
Preparation
Set up a SharePoint List which will serve as the central mapping List. Herein you will store IDs/SiteNames as well as URLs of all Sites within the Hub. In our case it was the users-list where we stored all Names, eMails, SiteURLs and so on.
Like this:

Next, create a Canvas app within PowerApps. Therein set the onStart function to set a variable with the current user’s email, as well as the identificator you chose to identify the corresponding user’s SiteCollection.
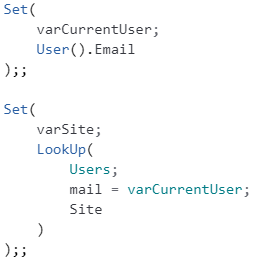
We now have a variable containing the current user’s mail address as well as one variable containing the site name of the current user. Both of those will be needed further down the line.
The Flow (Power Automate)
So after taking the preliminary steps in Power Apps it’s now time to move to Power Automate and create a Flow. Best way to do so is directly from Power Apps. Switch to the Actions Tab and click on Power Automate:

In the opening side bar/window choose „create new flow“. If you have chosen your Timer Control the new Flow should be automatically associated with it.
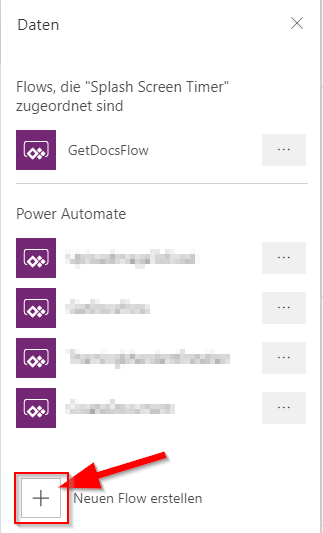
I called mine GetDocsFlow and as you can see it is associated with my Timer Control.
Constructing the Flow
As with almost every single Flow that you’ll be creating, the first thing is to initialize some variables.
- You should initialize a variabel which contains the „base“ URL of your tenant with the corresponding path your SiteCollections are stored in like so: https://[yourtenant].sharepoint.com/sites/ and append the parameter from your Power App containing the name of the SiteCollection of the current user.
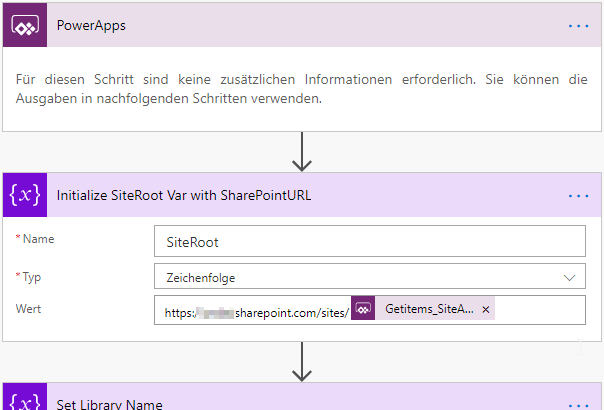
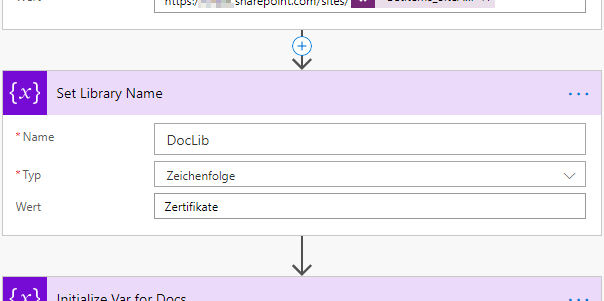
2. Initialize a variable in which you set the name of the library you want to get the information from. In our case it was a library where the employee’s certificates are stored.
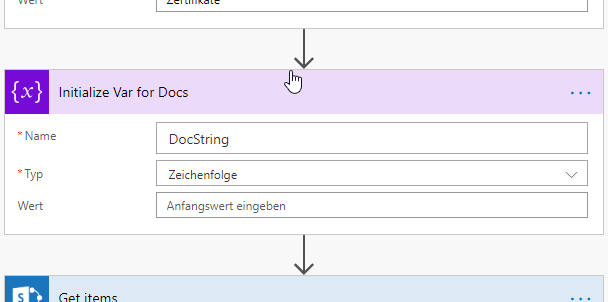
3. Initialize a variable to hold the queried data (*.csv)
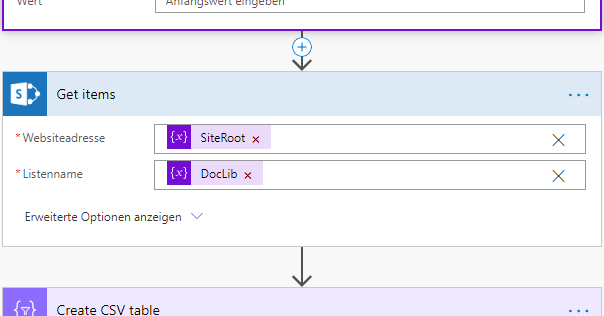
4. Get the items from the list/library with the SharePoint Get Items action, where you put your library variable from step 2 and the variable holding your Site Address from step 1 in the corresponding fields.
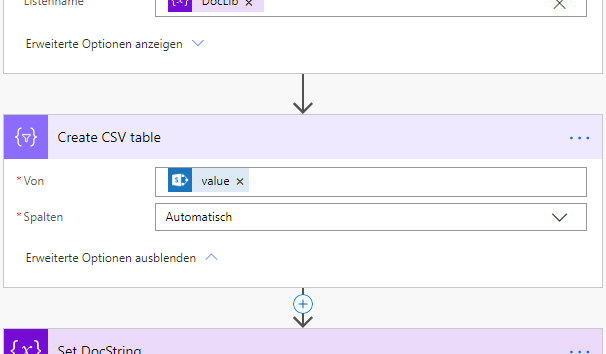
5. Use the Data Operations action Create CSV Table to create a CSV table from the queried output
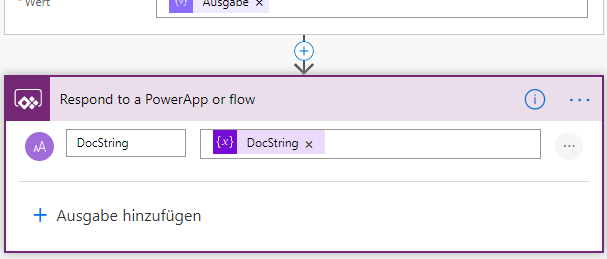
6. Next set the DocString variable to the Data Operation output
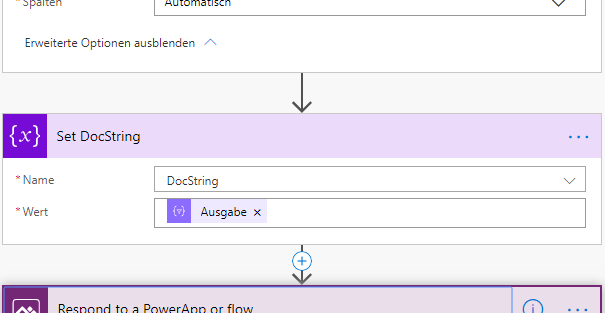
7. And finally send the result of the Flow as an response back to the PowerApp
Having completed the Flow you will need to make some more configuration steps in your PowerApp.
Start Screen
On the app’s start screen, you will need to set a timer control, which in turn will trigger the flow that will conseuqently query the needed SharePoint SiteCollection.
Set the AutoStart property to true. We have set the duration to 2000ms but you should be able to go lower.
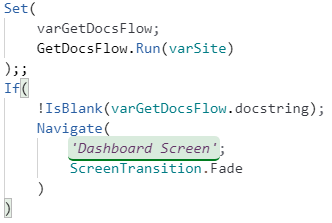
In the OnTimerEnd property you will trigger the flow. We also added an IF-statement to navigate to the next screen once we got a response from the flow.
Dashboard Screen
Since our app is an app designed to show multiple types of information for the logged in user, we do have a sort of dashboard screen where all that information is being aggregated.
On that screen I have placed another Timer Control to trigger the processing of the response from the Power Automate Flow, as well as a gallery to show the result of the processing.
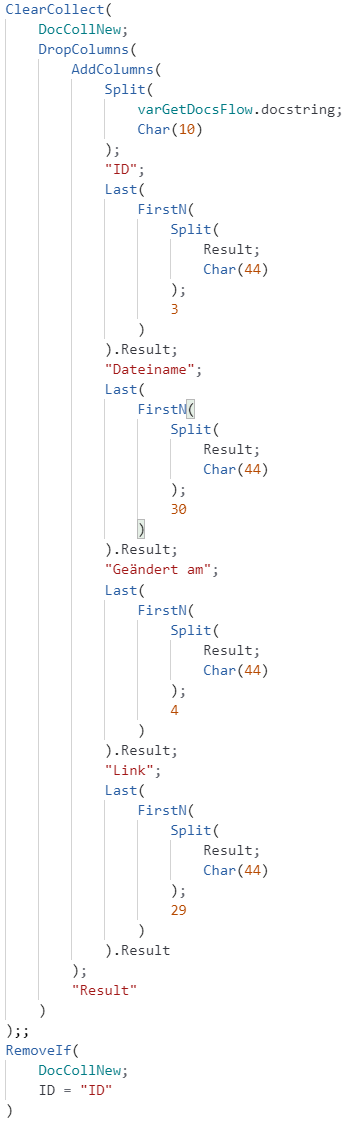
The Timer Control is set to AutoStart = true and onTimerEnd triggers the script shown on the right hand side.
What we are doing here is creating a collection (DocCollNew) through splitting the CSV data we received as a response from the Power Automate Flow. Depending on where in your CSV the needed data is stored, you will want to change the parameters accordingly.
Finally we check if an entry is already in the collection and remove it with the final IF-statement.
The Gallery
The last step is to simply add the new collection as datasource to a gallery control and select the appropriate fields to display.
Example: ThisItem.ID or ThisItem.Title.
We also got the item link in our collection and use that with Launch(Link) to enable the users to open the documents from within the app.
