- Posting a clickable message in Teams to your preferred substitute via PowerAutomate and sending back the response to the requestor.
- Create a Calendar-Entry in Outlook
- Create Entries in Dynamics 365 for every day, leaving out weekend and fixed holidays
- Inform HR and additional Teams of your Choice via Message (Adaptive Card) in Teams
- AND: Setting up the Automatic-Replies in Outlook for all Users in your Organization
(Note that only the last part is covered in this Post. If you are interested in the other ones, just leave a comment)
What we will do
- Show the App-Registration in Azure AD to be able to use the OAuth-Token with the MS Graph Api in PowerAutomate afterwards.
- Set up the necessary permissions for the MS-Graph Api to be able to change automatic replies for other users than yourself.
- Create a Flow in PowerAutomate from scratch that runs on a daily basis and sets up the automatic replies for a user when the startdate of an absence-entry in a SharePoint List is equal to today’s date.
Requirements
- You need to be a global admin to be able to do the App-Registration and set the mailbox settings for other users or convince the global admin to do the necessary steps for you. (Should be no problem, because this solution is as easy as it is awesome : )
- PowerAutomate license for HTTP-Request (Premium-Connector)
- Create a SharePoint List or use an existing one with at least a date column and a text column (for the user’s email address).
1. App-Registration
Login to the Azure Portal and go to Azure Active Directory > choose App Registrations
Click on the Plus-Symbol for new Registration
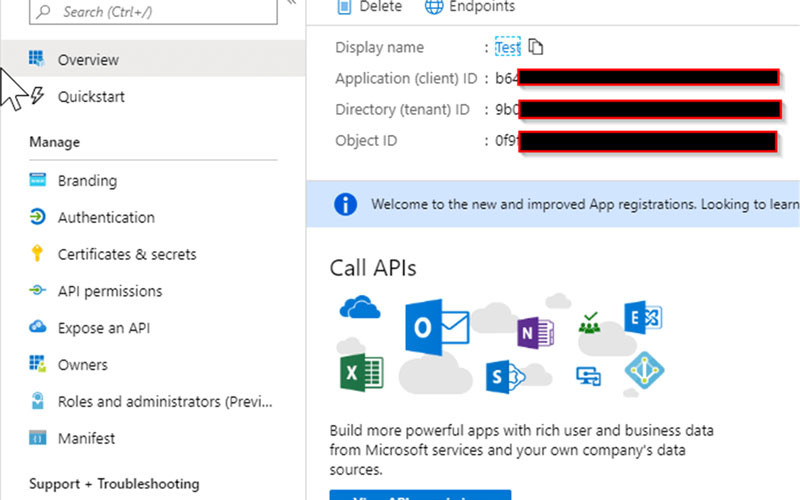
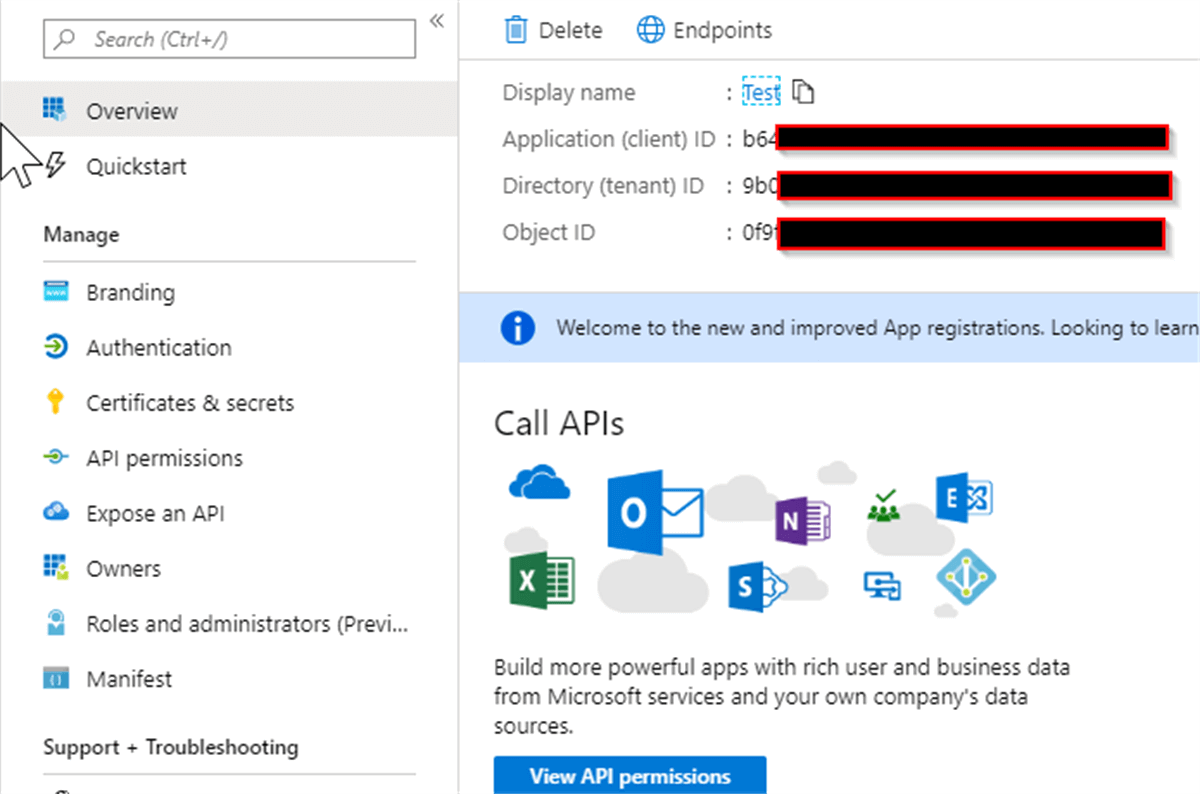
Simply select a proper name and select accounts in this organizational directory only for the supported account type. You can leave out the platform configuration. That´s it, the overview shows the following:
2. Set up Permissions
- Navigate to API Permissions in the menu. Click on Add a Permission. Choose Microsoft Graph and then Application permissions (as we don´t want to have a signed in user).
- Search for MailboxSettings.ReadWrite, select it and click on Add Permissions. (You will receive an info that the changes need admin consent and that the changes are not yet granted for your tenant).
- In the API permissions screen (same screen) you can click Grant consent for your tenant. Now it might take up to 60 minutes for the changes to happen. Luckily we don´t have to sit around doing nothing as we still have to build our flow. (But you might as well get a cup of coffee as we already finished most of the work already and in addition I would always recommend drinking coffee :-))
3. Build the Flow in PowerAutomate
- Choose your PowerAutomate App in the O365 Portal or go to flow.microsoft.com
- Create a new Flow from blank (skip all the settings or already type in a Name for your Flow)
- Search for Schedule as connector and choose Recurrence as a trigger and pick your favourite time.

4. Add a new action and add the action Get Items („Elemente abrufen“) for the SharePoint Connector. For this purpose, I built up a simple example list that contains the requestor („Urlauber“) start and end date, which can be created/updated manually in our example (in our solution, this is done via Powerapps and PowerAutomate). The SharePoint List looks like this:
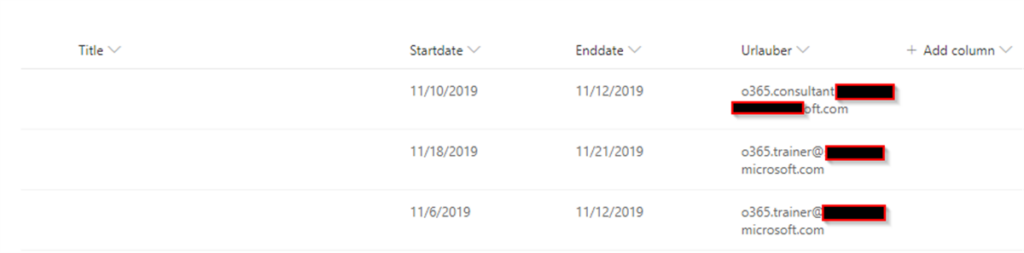
Note: be sure to set the Title Field to not required or add some text and set at least one entry of the start date to today´s date (we´ll need that to test the Flow later on.)
Site Address: choose the site address where your list is located. It should be already listed. (if not, you can choose custom value and type in the URL.)
List Name: Pick your list name from the dropdown
Filter Query: type in the query: {𝚂𝚑𝚊𝚛𝚎𝚙𝚘𝚒𝚗𝚝𝙲𝚘𝚕𝚞𝚖𝚗𝙽𝚊𝚖𝚎𝚏𝚘𝚛𝚂𝚝𝚊𝚛𝚝𝚍𝚊𝚝𝚎} 𝚎𝚚 ‚ {𝚎𝚡𝚙𝚛𝚎𝚜𝚜𝚒𝚘𝚗 ‚𝚃𝚎𝚡𝚝 𝙴𝚍𝚒𝚝𝚘𝚛
- The Expression: Click into the filter query field. On the right hand, click expression. Type in „𝚞𝚝𝚌𝙽𝚘𝚠(‚𝚢𝚢𝚢𝚢-𝙼𝙼-𝚍𝚍‘)„and click update.

5. Add a HTTP Request action. The action should be automatically wrapped into an apply to each action without further action.
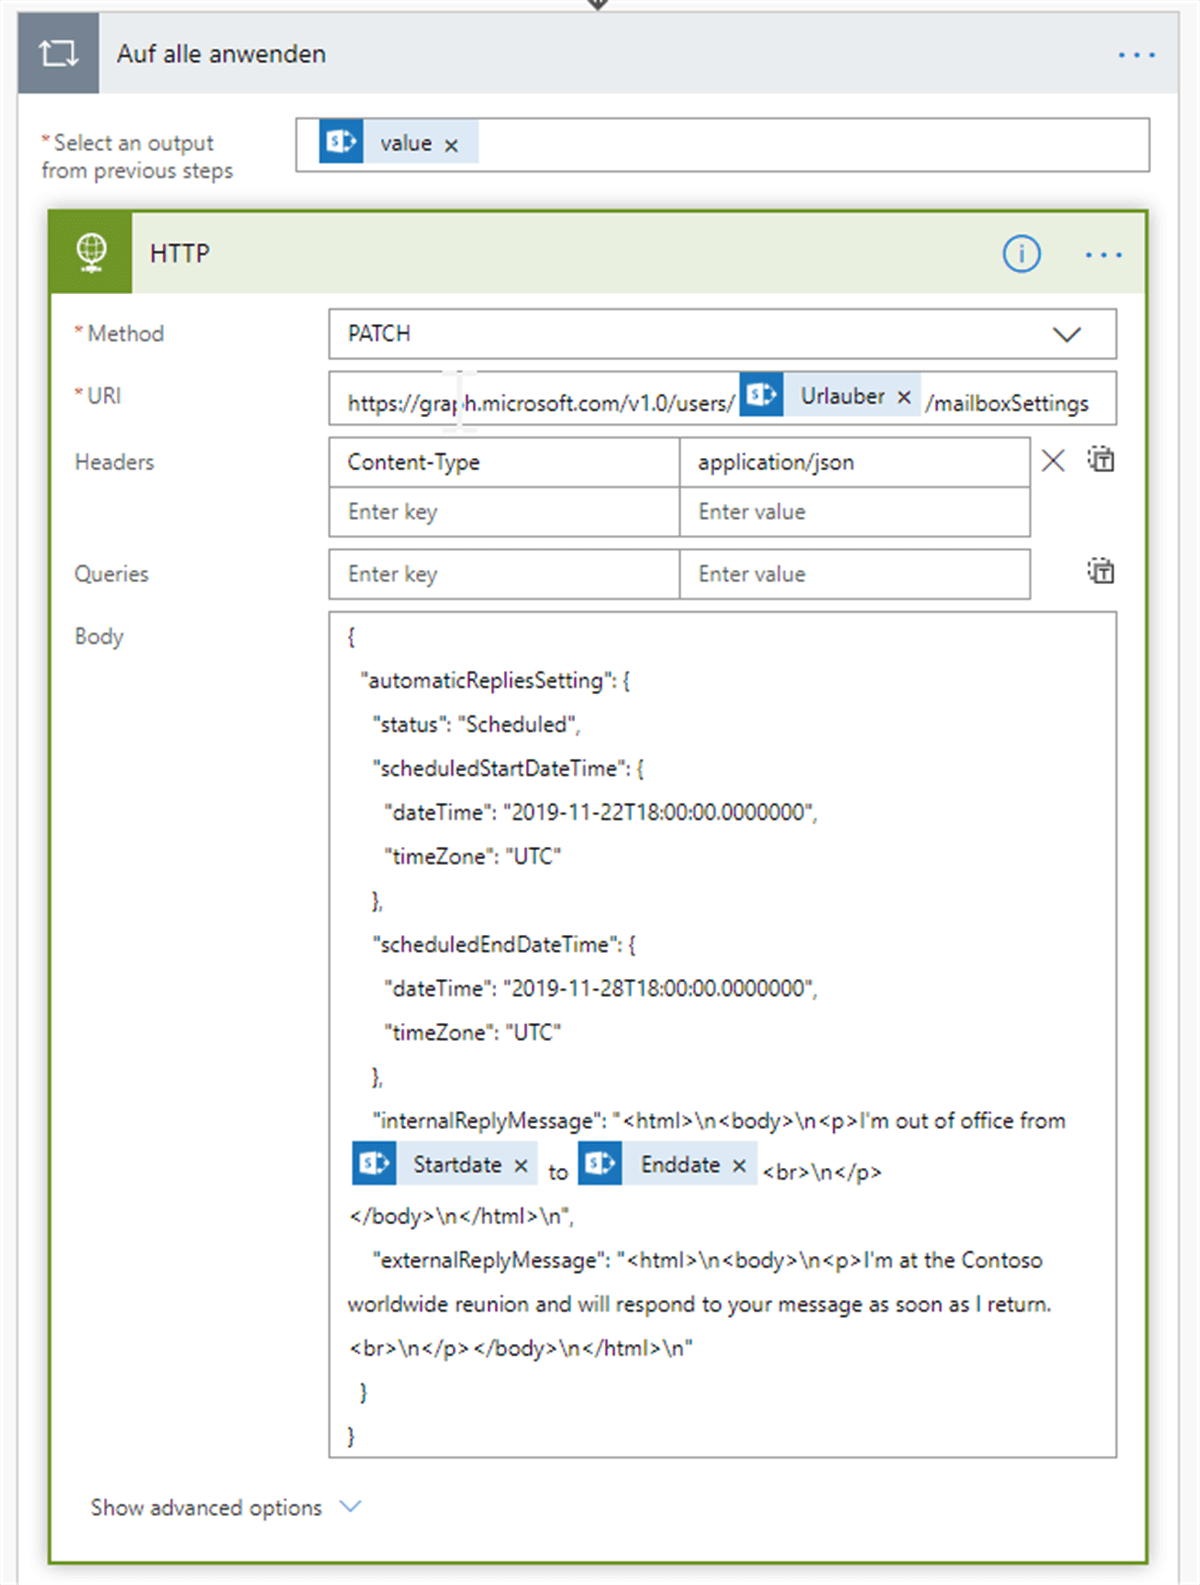
- Method: Patch
- URI: https://graph.microsoft.com/v1.0/users/dynamic Content/mailboxSettings. for the dynamic Content use the SharePoint Column with the Mail address of the Person who entered the holiday from the previous Get Items Action. (You should of course inform them before you test it, otherwise you might be in big trouble 🙂
- Headers: Content-Type / application/json
- Body: you can use this example:
{
„𝚊𝚞𝚝𝚘𝚖𝚊𝚝𝚒𝚌𝚁𝚎𝚙𝚕𝚒𝚎𝚜𝚂𝚎𝚝𝚝𝚒𝚗𝚐“: {
„𝚜𝚝𝚊𝚝𝚞𝚜“: „𝚂𝚌𝚑𝚎𝚍𝚞𝚕𝚎𝚍“,
„𝚜𝚌𝚑𝚎𝚍𝚞𝚕𝚎𝚍𝚂𝚝𝚊𝚛𝚝𝙳𝚊𝚝𝚎𝚃𝚒𝚖𝚎“: {
„𝚍𝚊𝚝𝚎𝚃𝚒𝚖𝚎“: „𝟸𝟶𝟷𝟿-𝟷𝟷-𝟸𝟸𝚃𝟷𝟾:𝟶𝟶:𝟶𝟶.𝟶𝟶𝟶𝟶𝟶𝟶𝟶“,
„𝚝𝚒𝚖𝚎𝚉𝚘𝚗𝚎“: „𝚄𝚃𝙲“
},
„𝚜𝚌𝚑𝚎𝚍𝚞𝚕𝚎𝚍𝙴𝚗𝚍𝙳𝚊𝚝𝚎𝚃𝚒𝚖𝚎“: {
„𝚍𝚊𝚝𝚎𝚃𝚒𝚖𝚎“: „𝟸𝟶𝟷𝟿-𝟷𝟷-𝟸𝟾𝚃𝟷𝟾:𝟶𝟶:𝟶𝟶.𝟶𝟶𝟶𝟶𝟶𝟶𝟶“,
„𝚝𝚒𝚖𝚎𝚉𝚘𝚗𝚎“: „𝚄𝚃𝙲“
},
„𝚒𝚗𝚝𝚎𝚛𝚗𝚊𝚕𝚁𝚎𝚙𝚕𝚢𝙼𝚎𝚜𝚜𝚊𝚐𝚎“: „<𝚑𝚝𝚖𝚕>\\\\\\\\\\\\\\\\𝚗<𝚋𝚘𝚍𝚢>\\\\\\\\\\\\\\\\𝚗<𝚙>𝙸’𝚖 𝚘𝚞𝚝 𝚘𝚏 𝚘𝚏𝚏𝚒𝚌𝚎 𝚏𝚛𝚘𝚖
𝙳𝚢𝚗𝚊𝚖𝚒𝚌 𝙲𝚘𝚗𝚝𝚎𝚗𝚝 𝚏𝚘𝚛 𝚂𝚝𝚊𝚛𝚝𝚍𝚊𝚝𝚎 𝚏𝚛𝚘𝚖 𝙶𝚎𝚝 𝙸𝚝𝚎𝚖𝚜 𝙰𝚌𝚝𝚒𝚘𝚗 𝚝𝚘 𝙳𝚢𝚗𝚊𝚖𝚒𝚌 𝙲𝚘𝚗𝚝𝚎𝚗𝚝 𝚏𝚘𝚛 𝚂𝚝𝚊𝚛𝚝𝚍𝚊𝚝𝚎 𝚏𝚛𝚘𝚖 𝙶𝚎𝚝 𝙸𝚝𝚎𝚖𝚜 𝙰𝚌𝚝𝚒𝚘𝚗
<𝚋𝚛>\\\\\\\\\\\\\\\\𝚗\\\\\\\\\\\\\\\\𝚗\\\\\\\\\\\\\\\\𝚗“,
„𝚎𝚡𝚝𝚎𝚛𝚗𝚊𝚕𝚁𝚎𝚙𝚕𝚢𝙼𝚎𝚜𝚜𝚊𝚐𝚎“: „<𝚑𝚝𝚖𝚕>\\\\\\\\\\\\\\\\𝚗<𝚋𝚘𝚍𝚢>\\\\\\\\\\\\\\\\𝚗<𝚙>𝙸’𝚖 𝚊𝚝 𝚝𝚑𝚎 𝙲𝚘𝚗𝚝𝚘𝚜𝚘 𝚠𝚘𝚛𝚕𝚍𝚠𝚒𝚍𝚎 𝚛𝚎𝚞𝚗𝚒𝚘𝚗 𝚊𝚗𝚍 𝚠𝚒𝚕𝚕 𝚛𝚎𝚜𝚙𝚘𝚗𝚍 𝚝𝚘 𝚢𝚘𝚞𝚛 𝚖𝚎𝚜𝚜𝚊𝚐𝚎 𝚊𝚜 𝚜𝚘𝚘𝚗 𝚊𝚜 𝙸 𝚛𝚎𝚝𝚞𝚛𝚗.<𝚋𝚛>\\\\\\\\\\\\\\\\𝚗\\\\\\\\\\\\\\\\𝚗\\\\\\\\\\\\\\\\𝚗“
}
}
6. Now we finally can use our OAuth Token from the app registration. Click on Show advanced options in the HTTP Action. To fill in the tenant Client ID and the secret, you must open the overview of the App-Refgistration in Azure Active Directory again.

- Authentication : Active Directory OAuth
- Tenant: copy from App-Registration overview: Directory (tenant) ID
- Audience: https://graph.microsoft.com
- Client ID: Copy from App-Reistration overview: Application (client) ID
- Credential Type: Secret

- Secret: Navigate to Certificates and secrets and click on New client Secret. Copy & Paste.

We are finished
Now you can test your Flow in the top right corner of the Flow editor and if a start date was set to today’s date and the email address of the requestor was correctly entered, it changes the automatic reply in Outlook to the text that we pasted in JSon Style.
